Sunday, December 9, 2012
November DT project for Gina's Designs
Ah Yes, Its beginning to look alot like Christmas !!!.. ( well not here in Florida LOL But up north it is )
Hey Everyone, Jenna here. Just wanted to show you what I made for Gina's Designs DT Project for November !!..
Now THIS project was was truly a joy to make.. I love making ginger bread houses anyways, so when I saw this 3D gingerbread house kit in the DT package I was over the moon. Just looking at it makes me want to eat gingerbread cookies !!
Here is a little about how the project came together.
View of it lit up. I got the light from the dollar store, it is just a small bulb in a socket.... normally used with the ceramic Christmas village houses .
This is my Favorite Picture, the side view just makes me want to walk up and peer into the Window !!
Back View of the 3D Gingerbread House kit from Gina's Designs
Here is the side view of the house.. The shutters and Fence Piece came with the 3D Gingerbread House kit. I heat embossed the fence with holographic glitter embossing powder and then modified it to extend from the side of the house. The Icicles on all sides on the house are Actually separate pieces that I hot glued to the Roof once I had assembled it and then used Golden… pumice Gel, Extra Heavy Gel and white paint . I also used Glossy accents and Holographic Glitter over top of that to give it that shiny Icicle/Sugar coated look.
Full Frontal View of the 3D Gingerbread house Kit from Gina's Designs. The kit itself came with 6 structure pieces, two sizes of candy canes, Peppermint candy shapes, 2 Doors, 2 Door arches, 2 different size Shutter sets, Two Fencing Pieces, 2 small door shaped lattice pieces and 2 Large Lattice Pieces, 4 Icicle Strips and 2 gabled Icicle Strips.
Close up of the Front of the 3d Gingerbread house.. Graphic 45 Paper, Ginas’s Designs Laser cut candy Canes heat embossed with White and Red Tinsel Glitter Embossing powder. Mirrored Gingerbread Dude was found at the Dollar store .The Frosting/Snow Effect was Created using a combination of Golden pumice Gel, Extra Heavy Gel and white paint . I also used Glossy accents and Holographic Glitter over top of that to give it that shiny Icicle/Sugar coated look
I was playing with photo angles.
This is a close up of the back.. I used the peppermint shaped chipboard
laser cuts that are embossed with recollections red tinsel embossing
powder and the bigger ones are heat embossed with White and and
holographic Glitter. The shutters were embossed the same way. The paper used if the Nutcracker Suite From Graphic 45. I used velum in the windows to Simulate frosted glass and made cute little curtains out of scraps.
My Favorite Part of the this project was creating the Roof, as with the rest of the project, I used Graphic 45 Nutcracker suite paper, I cut 1.5 inch squares and alternated the patterned of Candy Stripes. I heat embossed the peppermints with Recollections embossing powder in Red Tinsel (Glittery Red) and a pearl paper backing. The Frosting/Snow Effect was Created using a combination of Golden pumice Gel, Extra Heavy Gel and white paint . I also used Glossy accents and Holographic Glitter over top of that to give it that shiny Icicle/Sugar coated look.
Well I know I had fun making it, and I hope you enjoyed looking at it ... I also hope that everyone has a wonderful Holiday and A great new year !!..
XOXO
Jenna
Saturday, December 8, 2012
October Design Team Project for Gina's Designs
Hello Hello,My Crafty Friends... With fall come and gone, I finally have gotten around Updating my Fall projects !!. The holiday season pretty much starts for me around Halloween , so now I am coming up on the tail end of busy family times !!..
So that being said , I wanted to share my October Design Team Project for Gina's Designs !!..
I had originally planned on doing a Halloween haunted house mini album, but unfortunately had an accident involving my two cats knocking over my paint brush water in the middle of the night... So one Soggy mini album later !!.
The silver lining of this is that I was able to FINALLY have a reason to use my G45 Paper !!!!
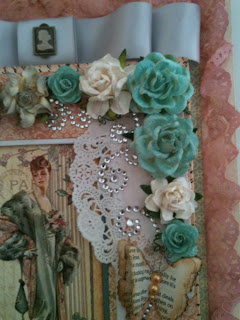
The Wall Hanging is 11 By 14 The base is a Canvas Board and I used a Chipboard Frame From TPC Studios.
The laser Cuts are embossed with Gold Embossing powder and then I used my Versamark pen to in Draw the Cushions. The Crocheted Doilies are From Julie at thepaperbaglady over on Etsy.
I used the same technique from the chair on the Dress form and I also used hand made embellishments from D& G Designs (can be found on www.ginasdesigns.net also.)
I used a variety of different sized flowers on this project, Most of them are I am roses, there are a few Gardenia Style Flowers from Recollections. I dyed the flowers using a watered down colorwash.
The paper line used was Graphic 45 A Ladies Diary... I was excited to Actually use it, Instead of letting it hide in my stash..
I Hope you like this project... I had more fun with it then I thought I would.... the instant panic of seeing a ruined project was pretty shocking, But I am pretty happy with how this all turned out !.
Hope everyone is having a great December !!
XOXO
Love Jenna
I Hope you like this project... I had more fun with it then I thought I would.... the instant panic of seeing a ruined project was pretty shocking, But I am pretty happy with how this all turned out !.
Hope everyone is having a great December !!
XOXO
Love Jenna
Friday, October 5, 2012
Fabulous Fall Flowers
Happy Friday my crafty blog friends !!!
Today's project is actually something i put together as a demo for a swap I am hosting over at www.crafthappens.ning.com. It is for a Fabulous Fall Flower Swap !. I really enjoy swapping it gives me a reason to craft and a reason to spend money on craft stuff . This particular swap is a make three get three back.. I am super excited to see what the swappers come up with.
The paper packs I used for these Flowers are both from DCWV, the Harvest Gathering Stack and the other was Amber Autumn Stack. they are from last years Halloween sale at Joann's (and I got them on clearance to boot)
For the flower layers I used the Cricut Flower Shoppe cartridge and for the leaves and greenery I used Recollections rose leaves and olive color tulle
The Daisy one is my Favorite of all the flowers, It is also the biggest, I just like how all the colors came together !, I tinted the leaved with Vintage Photo distress ink to give it that seasonal change of color.
I wasnt sure that the Blue was going to match with the Fall colors, but it gave the collection a touch of Whimsy that is brought out by the use of tulle
and Of course, I am always , always always a fan of the busy geometric patterns.
Well , I hope you like the flowers I made as much as I do, I am planning on doing a tutorial on making and shaping flowers here pretty shortly ( maybe in the next week or so) . That will be uploaded to Youtube and more than likely linked into here too.
Have a great day and Thanks for stopping by !
XOXO
Jenna
Thursday, October 4, 2012
Sept IAR Challenge
Hey there my crafty friends..
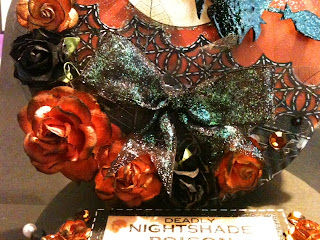
I used 5 different I Am Roses products ( Black roses- R21-723, Skeleton leaves - K1-275, Then Orange Flowers started out as white ones, I just dyed them using Ranger color wash sprays in Sunset Orange and Butterscotch) the white Flowers I used were R40-15 - 2 inch, R21-635 - 1.5 inch and R6-15- 1 inch. the little tiny ones on the bottom were dyed too, but I am not sure what the model number is on them because i got them in a rak!
Just wanted to show you one of my latest projects... it is for the I am roses Challenge Blog... The Challenge was to make a Halloween Themed Circle Card using At least two I am Roses products.. Here's what I came Up with !!! ( BTW, sorry for what looks like the same picture, I took it once with the over head light on and once without it , couldn't decided which one was better so it put them both !!!
The Moon, Witch and Bat were laser cuts I got from Gina's Designs that i embossed with white and black embossing powders (they come in the Spooky shape set). The poison label came from the the Haunted Estate paper pack by Theresa Collins, Used my EK Success spiderweb border punch and white gel pen for the faux stitching effect . I made up some stickpins with some Halloween colors and used black chiffon ribbon to make the spooky bow. I put Stickles on the Bow and ribbon Tails to match the glitter on the Label.
Here is a close up of the flowers, i was going for a crescent moon Idea for flower placement !!.
Well I hope you like my project, I had a lot of fun making it and I look forward to the future challenges from I Am Roses !!
Happy Crafting !!
Jenna
Gina's Designs DT Project for September
Soooo, you know how you start a new adventure with the full intention of sticking with it and following through with it, and being really good , updating and posting pictures of all the fun new projects that you find yourself doing ! Yeah, that being said , I have been ( up to this point ) a Terrible blogger LOL..
So, I am starting anew, Fresh, the slate has been wiped clean.. We are going to try this blog again !...
So with the fresh slate, I am going to post my most current projects... and going to keep this blog up to date !!!
This is my September DT Project For Gina's Designs... I was very excited when I got this in my package, I have had my eye on it for months and months and had not had the chance to work with it til now !! And I am sooo glad that I did.. I really like how it turned out. The kit for this project came to me in flat laser cut cutouts, Pieces for the Drawers and the butterfly doors, The walls for the inner box and the front and Back pieces. All pieces were cut out in what seems to be med weight chipboard.
Here is the front view, I papered the whole thing inside and out. I used a K&Co Paper Stack ( I will update the blog with the name of it as soon as I can) The armoire stands about 11 inches tall , 4.5 inches wide and 4 inches deep. I used clear faceted beads and silver spacers for the drawer pulls.
Side profile: I had the prettiest white venise lace that my dear friend Heather gave me forever ago. I knew I was saving it for something special and i nearly cried when I tool my scissors to it.The lace is accented my flat back pearl trim and small rhinestones.
Back view : I wanted to make the back of the project as pretty as the sides so i used more of the lace to create a pocket. Flat back pearls trim the pocket and it fits a HUGE tag.
This is a close up of the lace... isnt it dreamy ! It was actually about an inch wider than what i used, but i saved what i cut off to use for another project.
Inside View: The inside is fully papered and it is plenty big enough to fit the coin envelope mini that I have mostly done. The door itself is held on with a paper hinge. It was my first attempt at putting together something from flat parts, so I probably used more paper than I needed too.. but over All, I really like how it turned out !!.
You can get this project and more at www.ginasdesigns.net or www.crafthappens.ning.com
I hope you liked my project and please feel free to comment if you have any questions.
Happy Crafting
Jenna!
Tuesday, January 10, 2012
Tis the Season..... Orig From 12/2011.. Updated 01/10/2012
And the season is almost Over !!!.. I hate to see it go but am glad the things can settle down a little... I did a number of projects over the Holiday.. I made a Santa Baby Scrapbook page for my Boss, and for another coworker I did a Blue and Orange Layout with a Phrase in Italian... and I made an ornament for a friend of my mom.. But of course I didn't remember to take pictures LOL.... I am trying to get some sent to me , So I can post a few and From here on out I will try very hard to remember to take pictures !!.. Bad Crafter LOL... I will have pictures posted for the projects that I could get pictures of tonight.. I will show the Orange and Blue layout for sure and the ornament as soon as I get them from my mom..
On a different note....
I Just got a number of the Aderondak Alcohal Inks... and I LOVE LOVE LOVE them... I used them on the Blue and Orange Layout and For the project I am currently working on... I think it turned out nice...
On a different note....
I Just got a number of the Aderondak Alcohal Inks... and I LOVE LOVE LOVE them... I used them on the Blue and Orange Layout and For the project I am currently working on... I think it turned out nice...
The Ribbon Reel Challenge Blog
Well Hello there !... seems like i was just here blogging yesterday !!
This is a card I made for The Ribbon Reel challenge blog... The Challenge called for Pink and Polka dots with ribbon or twine. So here is what I have come up with.
This is my first attempt at a challenge, I decided to make a card. I think it turned out pretty, I am planning on sending it to a Friend back home in MN. I hope she likes it..
I have originally intended to put this in TWO challenge blogs.. The one for the Ribbon Reel and one for The Shabby Tea Rooms Vintage Boudoir Challenge... But I missed on the color scheme for TSTR ,I have time though, I might still put something together for it...
I know this looks like the same picture, but it shows off the Glitter paper, that I adore !! The shapes were Die cuts from my Slice machine.. the Vintage Findings card and Remember This if I remember right.. The Vintage Beauty is mounted on a Baroque style shape and that is up on pop dots. Papers were distressed using the Rubber Stampede dye based ink pad using Fuscia and Brown. And for the buttons, I just snipped off the loop on the back and glued them on.
This picture was taken with my Iphone.. the phone doesn't have a flash, and it was taken in "natural" light, but it just shows how different the colors look in the different lighting. WOW !
Here is a close up of the beaded pins I made.. A work in progress for sure. I need to find a way to glue the beads without having glue visible... I made the little bow and used a few inches of a Making Memories star trim I got at Big lots...
I used the Adirondack alcohol ink in cranberry on the Bling Flourish , I think It gives it just a touch more dimension.
Well , I hope you like it.. I hope to improve more and more with every challenge...
Bright Blessings !
Jenna
Saturday, January 7, 2012
"Slice" me a peice of Creative pie...
Happy NEW YEAR EVERYONE !!.... This has been a very interesting first week of the year here at Jenna's Gems.. Three things happened to make note of... I caught a cold, which in an of its self isn't a GOOD thing.. however it did get me a much needed afternoon early out of work pass, which gave me time to mostly finish my very FIRST MINI ALBUM EVER !!!! So thats my Number 2.... And I say mostly Finish because I still have to make the majority of the tags, and do a couple of mats .... and embellish the heck out of it... and of course put some pictures in it.!..... I am super proud of myself for this mini because, And I will be VERY HONEST... I have a hard time finishing things I start... There, I said it LOL.
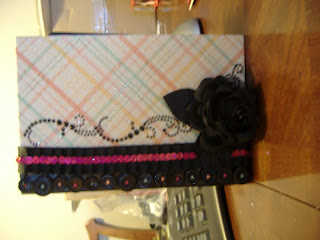
Rounded out the Corners... and Used a Martha Stewart All around the Page punch ( Loops i think it's called)
Black and White Recollections Bling from Michaels, Black pleated trim was from Hobby Lobby ( By the yard) and the Sequin trim was from Hobby Lobby also.. I attached buttons to the Front cover spine with coordinating floss colors for a little detail
The Mini was done using the Kathy Orta Style of envelope mini album. I learned a lot from doing it .. I followed her YouTube videos, they were super easy to do. Its a great Series and I am Planning on doing a paper bag mini album from her also... I used the Recollections Value Pack Blank card and Envelopes in Black with the Mango Frost Stack From DCWV ( Die Cuts With a View) as a base. I bound the album using Gusset Tabs and A Duck Tape Binding.... Which was kinda Cool because I have always had an interest in book binding anyways... So that was pretty neat to do... ( more of a note to self, Its pretty important to have all your page assemblies lined up Perfectly to each other when attaching your gussets, A Millimeter may not look like a lot but when you put the Binding together it wont stick flush like its supposed to.)....... So that's almost done.. I will work on it throughout the week and I am giving myself until this time next week to have it done.. ( see its nice to set goals for oneself)...
Now for number 3... I went to Michael's after work to pick up some more of the card and envelope value packs ( 2 for 5$, I bought 2 more packs in black and a pack of both the ivory and White.. SCORE!!!) and as I walk in the front doors I see two carts displayed with merchandise.. the Advertised product was the Slice Cordless design cutter From Making memories... Orig. priced out at 149.99 , marked down to 19.99 (no that's not a typo... 20 Bucks folks... 2.0.$) and Design Cards for that machine were in the Cart Next to it marked at 4.99 per Card...( Again not a type, 5 Bucks).. I approached this display with interest only to Find that all the actual Slice Machines were gone and all that were left were Design Cards... So I walk away and continue my shopping like one does... browsing through the dollar Bins ( now Priced at $1.50 I noticed), Going through the clearance section ( Just to double check there wasn't any thing I needed of course).. Mosey through the ribbon aisle before finally going to the papercrafts section. I grab my envelopes and head to the Tim Holtz stuff ,barley restraining myself from grabbing another set of alcohol inks ( those things are worse than Pokemon.. You got to have them ALL LOL ). I manage to abstain ( I needed to know which ones I did and didn't have already) .... I decide to treat myself by getting a Martha Stewart Deep edge punch (with a coupon of Course) and head for the Check out... $30.00 later and me and my purchases are on the Way out the Door...
What catches my eye as I am putting my cart Away ??? A single Slice Machine sitting all by its lonesome in the display cart. that had previously been empty... so I pick it up... At this point I have a very general idea that this is a die cutting machine.... Smaller and more portable than My Cricut expression.. perfect it seems for Making Die cuts for mini albums... So I decide to buy it and Four Design Cards... ( Basic Shapes 3, Spook Alley, Remember this and Weddings). All for about 40.00 Bucks... I am elated.. Excited about a new toy and a little Freaked out that I just dropped 70.00 Bucks at Michael's and all I NEEDED was the card sets ..
So I go on to Hobby Lobby to get my Glue Glider Refill and Paper Bags for the Mini I am planning next... I look at the Slice section at HL.. Those Design Cards are going for 49.99 EACH.... Needless to say I didnt get anything Except for the Glass mat adhesive... I leave HL and decide to go to the OTHER Michaels in Port Orange ( its newer and most times less picked over).. There i find the Tool kit (10.00) the design Card storage case (4.00), three more Design Cards ( Noel, Vintage Findings and Wedding again, Guess Im going to have to return it) and the Hands free kit ( 12.00)... The last item was marked at 39.99 at HL..... So Another fifty bucks out the door and Buyers Remorse starts to creep up... this is why all my new toys are sitting on my kitchen counter still sealed in their boxes with receipts handy... I will more than likely keep everything... It WAS an absurdly great deal... for less than ONE retail priced Cricut cartridge, I got the machine, seven image cards , tool case with tools, storage case and hands free kit... But i am going to sleep on it tonight.. and prolly play with everything tomorrow before going into work LOL...
That's my weekly update.. I think I am going to try to post a minimum of once a week.. kinda keep anyone who cares to read in the loop as to my Projects and Ideas. In the nearish future I am hoping to post links to Videos on Youtube on here too.. I did a haul video last week but haven't figured out how to upload it to Youtube from my iphone.. I may have to move it my the PC first and Upload from there... we shall see what happens... In the Meantime... Stay Safe and Stay Sane (any way you can!!)
See you next week.!
Jenna
(Edit Note : Sorry about the Sideways Photo ... still working out the kinks learning the whole blog thing )
This Mini Has Lots... I repeat lots of space for photos and Journaling...
17 Per Page Assembly, and I have four of them in the book... I guess I better start taking pictures LOL.
Rounded out the Corners... and Used a Martha Stewart All around the Page punch ( Loops i think it's called)
Black and White Recollections Bling from Michaels, Black pleated trim was from Hobby Lobby ( By the yard) and the Sequin trim was from Hobby Lobby also.. I attached buttons to the Front cover spine with coordinating floss colors for a little detail
The Mini was done using the Kathy Orta Style of envelope mini album. I learned a lot from doing it .. I followed her YouTube videos, they were super easy to do. Its a great Series and I am Planning on doing a paper bag mini album from her also... I used the Recollections Value Pack Blank card and Envelopes in Black with the Mango Frost Stack From DCWV ( Die Cuts With a View) as a base. I bound the album using Gusset Tabs and A Duck Tape Binding.... Which was kinda Cool because I have always had an interest in book binding anyways... So that was pretty neat to do... ( more of a note to self, Its pretty important to have all your page assemblies lined up Perfectly to each other when attaching your gussets, A Millimeter may not look like a lot but when you put the Binding together it wont stick flush like its supposed to.)....... So that's almost done.. I will work on it throughout the week and I am giving myself until this time next week to have it done.. ( see its nice to set goals for oneself)...
Now for number 3... I went to Michael's after work to pick up some more of the card and envelope value packs ( 2 for 5$, I bought 2 more packs in black and a pack of both the ivory and White.. SCORE!!!) and as I walk in the front doors I see two carts displayed with merchandise.. the Advertised product was the Slice Cordless design cutter From Making memories... Orig. priced out at 149.99 , marked down to 19.99 (no that's not a typo... 20 Bucks folks... 2.0.$) and Design Cards for that machine were in the Cart Next to it marked at 4.99 per Card...( Again not a type, 5 Bucks).. I approached this display with interest only to Find that all the actual Slice Machines were gone and all that were left were Design Cards... So I walk away and continue my shopping like one does... browsing through the dollar Bins ( now Priced at $1.50 I noticed), Going through the clearance section ( Just to double check there wasn't any thing I needed of course).. Mosey through the ribbon aisle before finally going to the papercrafts section. I grab my envelopes and head to the Tim Holtz stuff ,barley restraining myself from grabbing another set of alcohol inks ( those things are worse than Pokemon.. You got to have them ALL LOL ). I manage to abstain ( I needed to know which ones I did and didn't have already) .... I decide to treat myself by getting a Martha Stewart Deep edge punch (with a coupon of Course) and head for the Check out... $30.00 later and me and my purchases are on the Way out the Door...
What catches my eye as I am putting my cart Away ??? A single Slice Machine sitting all by its lonesome in the display cart. that had previously been empty... so I pick it up... At this point I have a very general idea that this is a die cutting machine.... Smaller and more portable than My Cricut expression.. perfect it seems for Making Die cuts for mini albums... So I decide to buy it and Four Design Cards... ( Basic Shapes 3, Spook Alley, Remember this and Weddings). All for about 40.00 Bucks... I am elated.. Excited about a new toy and a little Freaked out that I just dropped 70.00 Bucks at Michael's and all I NEEDED was the card sets ..
So I go on to Hobby Lobby to get my Glue Glider Refill and Paper Bags for the Mini I am planning next... I look at the Slice section at HL.. Those Design Cards are going for 49.99 EACH.... Needless to say I didnt get anything Except for the Glass mat adhesive... I leave HL and decide to go to the OTHER Michaels in Port Orange ( its newer and most times less picked over).. There i find the Tool kit (10.00) the design Card storage case (4.00), three more Design Cards ( Noel, Vintage Findings and Wedding again, Guess Im going to have to return it) and the Hands free kit ( 12.00)... The last item was marked at 39.99 at HL..... So Another fifty bucks out the door and Buyers Remorse starts to creep up... this is why all my new toys are sitting on my kitchen counter still sealed in their boxes with receipts handy... I will more than likely keep everything... It WAS an absurdly great deal... for less than ONE retail priced Cricut cartridge, I got the machine, seven image cards , tool case with tools, storage case and hands free kit... But i am going to sleep on it tonight.. and prolly play with everything tomorrow before going into work LOL...
That's my weekly update.. I think I am going to try to post a minimum of once a week.. kinda keep anyone who cares to read in the loop as to my Projects and Ideas. In the nearish future I am hoping to post links to Videos on Youtube on here too.. I did a haul video last week but haven't figured out how to upload it to Youtube from my iphone.. I may have to move it my the PC first and Upload from there... we shall see what happens... In the Meantime... Stay Safe and Stay Sane (any way you can!!)
See you next week.!
Jenna
Subscribe to:
Posts (Atom)