Friday, October 5, 2012

Fabulous Fall Flowers

 Happy Friday my crafty blog friends !!! 

Today's  project is actually something i put together as a demo for a swap I am hosting over at www.crafthappens.ning.com. It is for a Fabulous Fall Flower Swap !.  I really enjoy swapping it gives me a reason to craft and a reason to spend money on craft stuff . This particular swap is a make three get three back.. I am super excited to see what the swappers come up with.

 The paper packs I used for these Flowers are both from DCWV, the Harvest Gathering Stack and the other was Amber Autumn Stack. they are from last years Halloween sale at Joann's (and I got them on clearance to boot)

 For the flower layers I used the Cricut Flower Shoppe cartridge and for the leaves and greenery I used Recollections rose leaves and olive color tulle


 The Daisy one  is my Favorite of all the flowers, It is also the biggest, I just like how all the colors came together !, I tinted the leaved with Vintage Photo distress ink to give it that seasonal change of color.


 I wasnt sure that the Blue was going to match with the Fall colors, but it gave the collection a touch of Whimsy that is brought out by the use of tulle


  and Of course, I am always , always always a fan of the  busy geometric patterns.


 Well , I hope you like the flowers I made as much as I do,  I am planning on doing a tutorial on making and shaping flowers here pretty shortly ( maybe in the next week or so) . That will be uploaded to Youtube and more than likely linked into here too.

Have a great day and Thanks for stopping by !

XOXO

Jenna 

Thursday, October 4, 2012

Sept IAR Challenge

 Hey there my crafty friends..

 Just wanted to show you one of my latest projects... it is for the I am roses Challenge Blog...  The Challenge was to make a Halloween Themed Circle Card using At least two I am Roses products.. Here's what I came Up with !!! ( BTW, sorry for what looks like the same picture, I took it once with the over head light on and once without it , couldn't decided which one was better so it put them both !!!


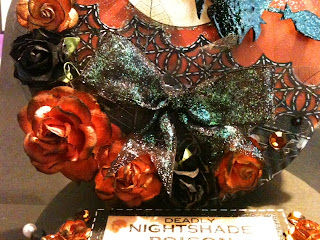
  I  used 5 different  I Am Roses products (  Black roses- R21-723, Skeleton leaves - K1-275,  Then Orange Flowers started out as white ones, I just dyed them using Ranger color wash sprays in Sunset Orange and Butterscotch) the white Flowers I used were R40-15 - 2 inch, R21-635 - 1.5 inch and R6-15- 1 inch. the little tiny ones on the bottom  were dyed too, but I am not sure what the model number is on them because i got them in a rak!


 The Moon, Witch and Bat were laser cuts I got from Gina's Designs that i embossed with  white and black embossing powders (they come in the Spooky shape set). The poison label came from the the Haunted Estate paper pack by Theresa Collins,  Used my EK Success spiderweb border punch and white gel pen for the faux stitching effect . I made up some stickpins with some Halloween colors and used black chiffon ribbon to make the spooky bow. I put Stickles on the  Bow and ribbon Tails  to match the glitter on the Label.


Here is a close up of the flowers, i was going for a crescent moon  Idea for flower placement !!.

 Well I hope you like my project, I had a lot of fun making it and I look forward to the future challenges from I Am Roses !!

 Happy Crafting !!

 Jenna


Gina's Designs DT Project for September

Soooo, you know how you start a new adventure with the full intention of sticking with it and following through with it, and being really good , updating and posting pictures of all the fun new projects that you find yourself doing ! Yeah, that being said , I have been ( up to this point ) a Terrible blogger LOL..

   So, I am starting anew, Fresh,  the slate has been wiped clean.. We are going to try this blog again !...

  So with the fresh slate, I am going to post my most current projects... and going to keep this blog up to date !!!

 This is my September DT Project For Gina's Designs... I was very excited when I got this  in my package, I have had my eye on it for months and months and had not had the chance to work with it til now !! And I am sooo glad that I did.. I really like how it turned out. The kit for this project came to me in flat laser cut cutouts, Pieces for the Drawers and the butterfly doors, The walls for the inner box and the front and Back pieces. All pieces were cut out in what seems to be med weight chipboard.

 Here is the front view, I papered the whole thing inside and out.  I used a K&Co Paper Stack ( I will update the blog with the name of it as soon as I can) The armoire  stands about 11 inches tall , 4.5 inches wide and 4 inches deep. I used clear faceted beads and silver spacers for the drawer pulls.


Side profile:  I had the prettiest white venise lace that my dear friend Heather gave me forever ago. I knew I was saving it for something special and i nearly cried when I tool my scissors to it.The lace is accented my flat back pearl trim and small rhinestones.

Back view :  I wanted to make the back of the project as pretty as the sides so i used more of the lace to create a pocket. Flat back pearls trim the pocket and it fits a HUGE tag.


This is a close up of the lace... isnt it dreamy ! It was actually about an inch wider than what i used, but i saved what i cut off to use for another project.


Inside View:  The inside is fully papered  and it is plenty big enough to fit the coin envelope mini that I have mostly done. The door itself is held on with a paper hinge. It was my first attempt at putting together something from flat parts, so I probably used more paper than I needed too.. but over All, I really like how it  turned out !!.

 You can get this project and more at www.ginasdesigns.net  or www.crafthappens.ning.com

 I hope you liked my project and please feel free to comment if you have any questions.
Happy Crafting

 Jenna!